Reviews and Other Stuff

Glossier Cloud Paint & Balm Dotcom Review And Swatches

glossier balm dotcom and cloud paint review


It’s been a while since I reviewed some Glossier products. The last time I talked about them was when I was just getting to know their stuff. You can check out that review HERE. Since then, I’ve fallen in love with Glossier. I always reach out for their products whenever I feel like I wanted something light, easy, and natural to use. Even during this Summer, I always have a glossier product in my purse, and lately, I’ve been loving their Cloud Paints (0.33 oz: $18) for that sheer and breezy pop of color on the cheeks, as well as their Balm Dotcoms (0.5 oz: $12) for that multipurpose lip and skin moisturization.


Over time, I’ve collected a few more shades of the Glossier Balm Dotcoms as well as the Cloud Paints. What I love about the Balm Dotcoms are their versatility. I could either use them as a lip balm or as a skin cream and boy, do they smell so good. Each tube is pretty much a sensory experience. You can definitely smell the true scents of cherry, birthday cake, mint, etc. among other things. Try using these balms at night, and you will feel like you’re being transported somewhere dreamy, delicious, and nice. LOL. For me, these Balm Dotcoms are probably one of the best lip balms I’ve ever tried since they not only have that nice flavoring, they’re also very soothing and hydrating on the lips. The formula is perfect for restoring dry chapped lips to a hydrated one overnight. They also aide in softly removing dead skin cells as well as retaining the skin’s moisture. The consistency is very creamy, dense yet feels lightweight, and non-sticky. There are several flavors/shades to choose from, ranging from untinted to a sheer tint. The packaging is also cute and pretty much easy to carry everywhere.

glossier balm dotcom in mint, cherry, birthday and rose


Rose – smells like a true rose with a subtle pink tint

Cherry – strong bubblegum cherry with a sheer reddish tint

Birthday – delicious birthday cake with very subtle shimmer and slightly exfoliating (sugar bits). No tint.

Mint – true peppermint scent that feels cooling. No tint.


As for the Cloud Paints, they’re pretty much foolproof to use, and you can never apply too much since they’re easy to correct. They’re not the type of liquid blushes that are super staining. Instead, their pigments are sheer but buildable, kinda like being lit from within, or having that natural flush. There are several shades to suit everyone’s skin tone, plus there are two new shades that have been added recently to this Glossier liquid blush lineup – the Dawn and Storm shades, which I haven’t tried yet, but I will pretty soon. The formula is not very liquid, but more of a very lightweight creamy gel. It’s very easy to spread and blend around the cheeks and you can pretty much build its intensity. I didn’t notice any scent and it’s perfect to wear if you have oily skin. The overall effect of these liquid blushes is very natural.

glossier cloud paint review


Beam – soft peach

Haze – deep berry

Dusk – brownish nude


glossier cloud paint haze, dusk, beam, and balm dotcom mint, rose, cherry, birthday swatches


Overall, I am deeply in love with these Glossier Cloud Paints and Balm Dotcoms. As someone with an oily skin type and with a tendency to have dry lips, these products are heaven-sent. I love that they’re affordable, that they come in several colors and the fact that their packaging is SO cute. Also, if you buy Glossier’s products, you’ll get a free pink bubble pouch which is perfect for traveling or for just storing and organizing your favorite makeup and skincare.


Are you into the gloss?


These Glossier Balm Dotcoms and Cloud Paints are currently available at http://www.glossier.com

glossier cloud paint review


Favorite Oil-Control Blotting Papers

As a lover of face glows and highlighters but with an oily-prone skin type, it can be quite a challenge to use some strobing products especially in the middle of the Summer. A couple of weeks ago, one sunny afternoon, I was all excited to put on my makeup. I thought I nailed my strobing technique and I was out and about thinking how glowy and naturally lit I must have looked. The weather suddenly became so intensely hot and humid that when I got to my car and glanced at myself at the rear-view mirror, I suddenly realized “What in the devil have I done?!” LOL! My face was glowy, true, but it was way too glowy that it looked so oily. It was like I slathered olive oil on my face. I thought “What? How could this be?” when I left home, I didn’t look like this, I even had a mattifying foundation on. Oh my, lesson learned, go easy with the highlighting especially if the weather gets really warm and humid, and if you have an oily skin type, well, you’re going to need all the help you can get, starting with a really good oil-control blotting paper.


best oil-control blotting papers


Unfortunately, when that story happened, I forgot my blotting paper, Arrrgh…, and I usually carry a pack in my purse. I did have a pressed powder with me, but I don’t really like applying powders on my face without getting rid of most of the oil first. It just seems gross. So, immediately, I went to the closest beauty store I could find and did some panic buying of several oil-control blotting sheets. Since then, I’ve been obsessed with testing the blotting papers I purchased. I normally use the Too Cool For School Dinoplatz blotting papers, but I found out that there are several brands that are actually a lot better than this particular blotting paper nowadays.


The following are my faves:


Shiseido Oil-Control Blotting Paper (100 sheets: $18.50) – These sheets are large and have a slightly powdery feel. They have a very very subtle floral scent that is almost undetectable and they absorb the oil very well. They’re also mattifying and they come in a convenient easy “pull-out release” type of packaging, encased further by a small white envelope. These don’t disturb the makeup and they don’t disintegrate easily while being blotted on the face. I love these for their size and their ability to absorb excess oil very well without having to rub them on the face.


Tatcha Aburatorigami Japanese Blotting Papers review


Tatcha Aburatorigami Japanese Blotting Papers (30 Sheets: $12) – These blotting sheets are expensive but they’re also very impressive. Their size is larger than average and each sheet has gold flakes. They may feel thin but they don’t break easily. Also, they’re soft and are extremely absorbent. In fact, these sheets are the most absorbent of all the blotting papers mentioned in this review. They can even absorb excess oil that most blotting papers cannot do, and they don’t leave your fingers oily. Since each sheet is large, one is enough to cover the whole face.


Too Cool For School. Dinoplatz Dear Brachiosaurus Oil Blotting Paper (50 sheets: $8-11) – These have been my go-to blotting papers for some time. The sheets are small and are really thin but the packaging is the most attractive of these. It’s so convenient to use because the sheets are housed in a compact type, complete with a mirror and a sticky sponge that grabs each sheet for easy dabbing on the skin. It’s great for not making your fingers oily but since the sheets are too thin and too small, it can be hard to see whether they actually absorb any excess oil or not. I’m sure they do because the excess shine from my face is gone, but then again, the sponge also gets oily and it spreads to the next clean sheets. So that’s something to consider.


Sephora Collection Blotting Papers review herbal rose and bamboo charcoal


Sephora Collection Blotting Papers (100 sheets: $8) – These blotting papers work well and they come in three different kinds; Natural Tea Tree, Bamboo Charcoal, and Herbal Rose. The sheets are not too thin so they don’t break easily and they’re square-ish. They’re also inexpensive and they get the job done, which means they absorb excess oil from the skin very well. The packaging is also cute and very convenient to use since there’s a flap with a sticker that pulls one sheet at a time for easy dispensing. If it wasn’t for their size, these sheets are probably the closest dupe to Shiseido’s.


Bamboo Charcoal – mattifying

Herbal Rose – nice powdery rose scent


Boscia Blotting Linens (100 sheets: $10) – Love these for the large sheets which are easy to grab and they feel very soft. They’re also very good at absorbing excess oil and they come in Green Tea, Clear, and Black Charcoal. They also don’t disturb the makeup since the sheets are very good at absorbing any excess oil and I love their refreshing scents. Also, I didn’t notice any oil transfer to my fingers whenever I use them, and one blotting sheet is enough to cover the whole face. However, they do have a tendency to break while being used since they’re a bit on the softer side and they’re so absorbent at the same time.


boscia blotting linens in green tea and black charcoal


Green Tea – true and subtle green tea fragrance

Black Charcoal – slightly floral scent


Another blotting paper I wanna mention is the good ol’ drugstore favorite -the Neutrogena Deep-Clean Blotting Sheets. They’re cheap, easy to find, and they work. If it wasn’t for their small size, I’d say they’re also great.


Too Cool For School. Dinoplatz Dear Brachiosaurus Oil Blotting Paper


Bottom line, I love all the blotting papers reviewed here, but if I have to pick my top three, they would be: Top one- the Tatcha Blotting Papers, followed by Shiseido’s for the second place, and third would be the Boscia Blotting Linens.


Do you use these at all? what’s your favorite blotting paper?


Semisweet Raspberry Kiwi Popsicle Recipe

Hello You! Advance Happy Weekend. It’s been a while since I’ve posted a recipe here on the blog. I do have some recipes and cooking plans to share soon, apart from talking about makeup and some other beauty-related stuff. Today’s post is definitely an ideal one since it’s the Summer, and everyone wants something cool and chilly to have on their palates. This recipe stemmed from my idea of wanting to eat a popsicle on a hot and humid Summer day a couple of weeks ago. I mean, who doesn’t want popsicles or ice creams on a weather this sweltering, right? The problem with most popsicles and ice creams at the local grocery stores or at specialty shops is that they tend to be high in sugar, and if they’re not, they probably have some artificial sweeteners which usually leave a weird aftertaste. I do have a sweet tooth, it’s my weakness, but lately, I’ve cut back my sugar intake and realized that I haven’t craved that many sweets anymore.


popsicle recipe


So, I decided to make my own popsicle with clean simple ingredients and with less sugar. It’s very easy to do and it’ll probably just take a few minutes of your time. Here’s the recipe.


Ingredients:


For Blending:


raspberry kiwi popsicle ingredients

1 cup whole milk or whichever you prefer

1/4 cup condensed milk (add 1/4 cup more if want your popsicles sweeter, also, you can use granulated sugar).

1/3 cup whole raspberries

1/2 cup SunGold kiwi (peeled and quartered)

1/2 cup water


Set-aside:

sungold kiwi and raspberry popsicle ingredients

1/3 cup (2.8 oz ramekin) peeled and thinly sliced SunGold kiwi (I prefer this kind of Kiwi because it’s less acidic, sweeter, and juicier than a regular Kiwi)

1/3 cup (2.8 oz ramekin) sliced and whole raspberries


Materials:


Personal Blender


A Personal Blender or single-serve smoothie-maker. Any other smoothie-maker regardless of size and brand will do. Here in the photo, I use the Epica Personal Blender I bought on Amazon, but it’s currently sold out. I’ve also had good experiences with Oster My Blend Blender with Travel Sport Bottle, and the Nutri Ninja Pro Personal Blender.


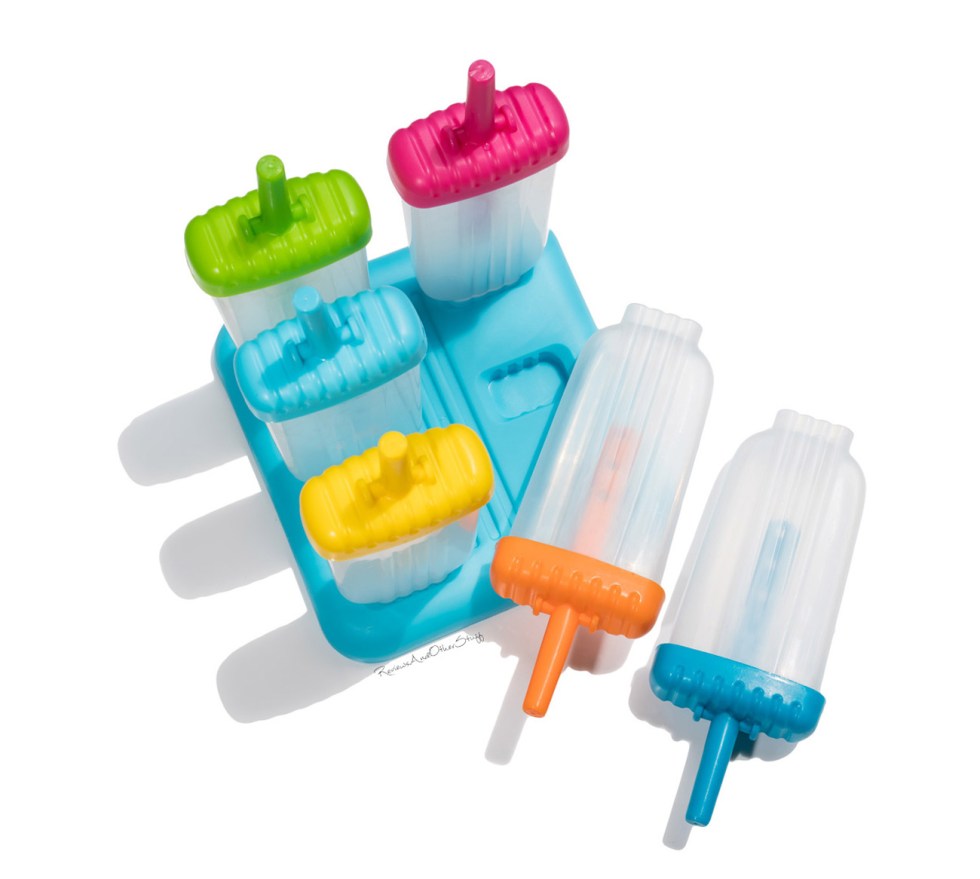
Ozera Reusable Popsicle Molds


Popsicle Molds – There are several on Amazon, but I especially like the Ozera Reusable Popsicle Molds in assorted colors. It comes in a silicone funnel and a small brush for cleaning. The size is about 2 x 4.5 inches.


Direction:


  1. Blend all the ingredients found in the “For Blending” list with a personal blender. It takes about a few seconds. Blend it until it looks like a smoothie. The Epica Blender used here is about 20 oz and it’s great for making a single-serve smoothie. It’s easy, sturdy, and efficient to use. It’s also convenient to clean and it crushes ice easily. I use it a lot to make a smoothie or juice post-workout. It comes in a sealable lid so you can just take the bottle to-go. Also, it’s spill-proof and break-resistant.

how to make popsicle smoothie

  1. After blending, it should look a bit purplish. Transfer the blended contents (smoothie) to the popsicle molds using the silicone funnel, stopping halfway to add the set-aside kiwi and raspberry. Also, try putting the kiwi and raspberry first on some molds, then pour the smoothie next. Do it alternately to add some design and style to your popsicle. I like these plastic molds a lot, they’re really sturdy and they’re so easy to use. They’re designed with a drip guard so you won’t get the sticky fingers while eating the popsicles. Also, the molds come with a stand so that they won’t tip inside the freezer, and it that way, they can be easy to store.

simple popsicle recipe

  1. Make sure you don’t fill up the popsicle molds completely. Place the lid with the stick back to the molds. Once you’re done, it should like the picture above. Take note that you’ll probably still have some smoothie left in your blender. Either you can drink it, save it, or add some more ingredients to it so you can make another smoothie. Whichever works for you.


  1. Make sure that the molds are properly sealed and are supported well by the stand, then place them in the freezer.


  1. Wait a few hours (3 or 4 at least) for the popsicle to be ready. I usually leave mine overnight. Serve it and Enjoy! If the molds are difficult to remove, just run it under warm water and it can be pulled out easily. The stick with drip guard holds onto the popsicle very well.


My tolerance to sweets may be a lot different than yours, so feel free to add more sugar if you don’t find these popsicles sweet enough, or you can even use purees, juices, gelatins, jams, and even puddings as popsicles. It’s a lot of fun to experiment and customize this recipe, and it’s a great and entertaining activity for you and for your family.


*measuring cups and ramekins used in this recipe are from HomeGoods.